Git with the Flow
How High Seas reworked Git Flow to work for our teams.
If you have ever built a piece of software more complex than “Hello World”, you are probably familiar with the concept of version control. You might also be acquainted with Git, a popular tool for managing code bases. Git offers a wonderful system for organizing code, and keeps a record of who did something and when they did it. It gives developers the ability to branch off and work on sections of code without affecting the main codebase until they are ready to merge those branches back into the source.
The power behind Git, while incredibly useful, can also be incredibly confusing. Here at High Seas we have multiple teams of remote designers, developers, testers, and project managers. We build large scale applications with service oriented architecture. Depending on the client, these projects can be split across several small repositories, or one repository can hold several different projects.
For example, we have a client with 7 services split across 4 repositories and a production team that is dispersed between 4 US states and 1 Canadian province. We schedule a new version release of their system every 1–2 weeks, and we need to be able to release important, unscheduled, features and bug fixes at a moment’s notice. We need to be able to reconcile the work that we are doing with the work that we have logged in our issue tracker, and make sure that the code that is making it out to production has been throughly tested and approved for release.
Why Don’t We Just Use Git Flow?
Git Flow is a popular branching model that is used by software teams to track their work towards a release. We like a lot of things about it and it served as the inspiration for our process. There were a few parts, however, that didn’t work well for our team. Check out this page if you want an in depth explanation of Git Flow. Here, I will just layout some good points and bad points.
NOTE: This section has been edited to more clearly define the differences between Git Flow and the High Seas Git Flow.
The Good
- Master branch always reflects the current state of production.
- The only commits allowed directly on master are to merge in code for the next release, and to tag the branch for release.
- “No Fast Forward” merges are used to ensure that commits from feature and release branches are grouped together in the commit history.
The Bad
- All feature branches are created from, and merged back into, a single develop branch. This increases the chances of a rouge feature making it into a release by mistake.
- Feature branches for features in a future release are left open indefinitely. This leaves more room for the branch to get stale and increases chances of merge conflicts. It also makes working on multiple releases simultaneously more complicated.
- Features are not assigned to a release until the last possible minute. Our team prefers to assign features to a release during our sprint planning.
- Release branches and hot fix branches are treated differently and use different processes. This causes needless confusion, since hot fixes are just unscheduled releases.
- There is no defined QA branch. A QA branch is useful for setting up continuous integration with a quality assurance environment. This enables us to test features in a sandbox a prevents untested code from mingling with code that is ready for release.
With the above pros and cons in mind, our team set out to develop a process that we believe is more streamlined and less confusing.
How does the High Seas Git Flow Work?
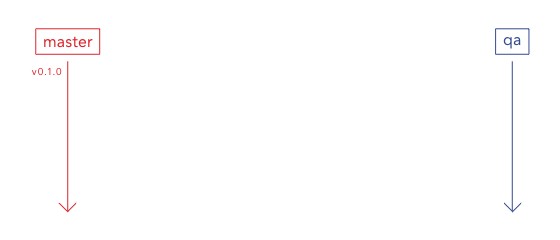
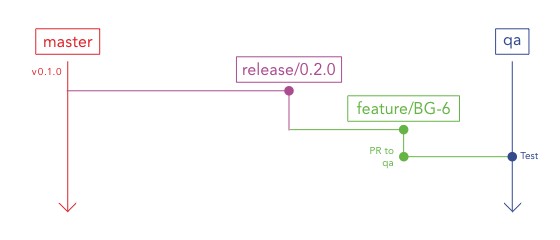
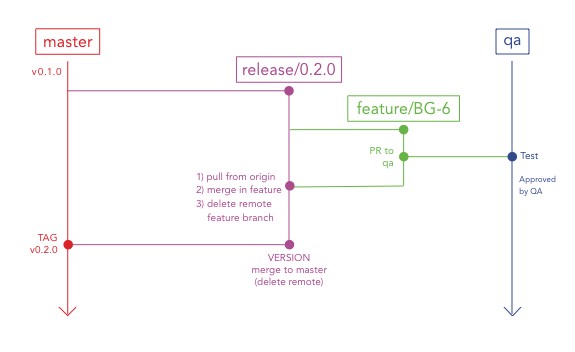
The process is actually not very complex. On a high level, it consists of 2 branches that live forever, master and QA. There are then release branches and feature branches that are created and deleted as needed.
Master is the source of truth for production code. QA is a branch for code that is ready to be tested. Work is never performed directly on either of these branches.
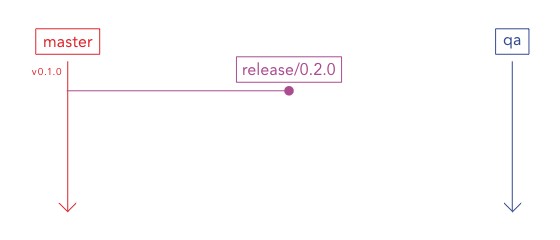
Creating a Release Branch
To start working on a feature, we’ll first need to create a release branch off of master. In the diagram above, master is at v0.1.0, so the next release will be v0.2.0. From this point until the release is ready to go out to production, the whole team will work off of this release branch.
NOTE: For regularly scheduled releases, we increment the minor version. Hot fix releases, which we will talk about later on, are incremented with the patch version.
Finding a Task in the Next Release
Now we need to find a task to complete. At High Seas, we use Jira to track stories and releases. Let’s head over to the backlog and find a task to work on. We’ll make sure that the task is assigned to the correct fix version, v0.2.0.
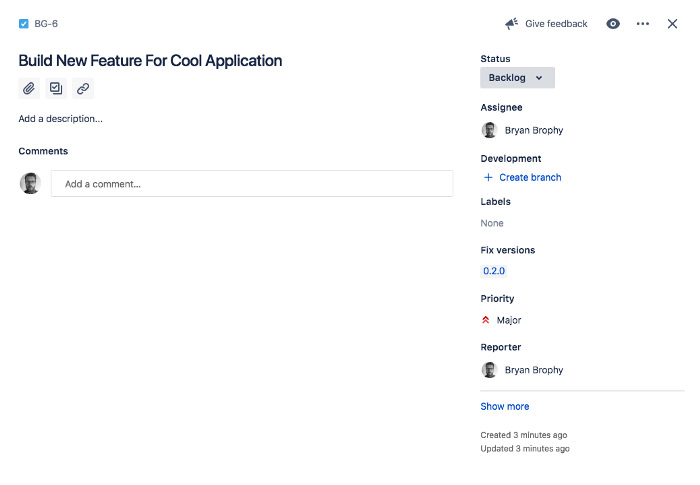
Find a task in your issue tracker that is assigned to the next version of the software.
We’ll move the task status to In Progress to let the team know that we have started working on it.

Move task into In Progress
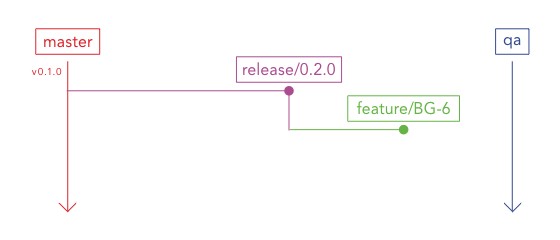
Creating a Feature Branch
Now that we have a feature to work on, we need to create a feature branch. To do this, we will branch off of the release branch we created for v0.2.0. We will give the branch a name that corresponds to the Jira task that we checked out. The task number is BG-6, so we will include this and a few descriptive words for more clarity. This will enable us to continuously associate the code we write in this branch with the task in Jira and in our remote repo on Bitbucket.
Code Review and Quality Assurance
Let’s assume that we have done the work required to get this task complete. To make sure that our code is ready for production we must do 2 things. First, we need to create a pull request to merge our feature branch into the QA branch. The reason we do a pull request, rather than merging directly, is so that another developer can look at our code and make sure that it is sound. Another set of eyes on your code can find small mistakes quickly and save the QA testers some work. Once our code passes a code review, the pull request will be approved and the code gets merged into the QA branch.
NOTE: It is important not to delete the feature branch at this time. We need to keep it around until the QA process is completed. We will discuss what happens after QA later in the article.
We have continuous integration setup so that any changes to the QA branch are automatically built, tested, and deployed to a QA environment. At this point, we will move the Jira ticket into the Ready For Review column. We should also leave a comment for the QA tester, letting them know that the feature is ready for testing.

Move task into Ready For Review
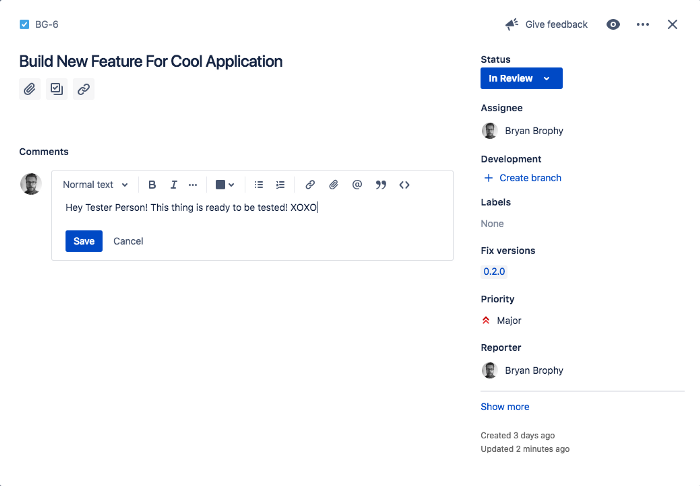
Leave a comment for the QA tester
Our little feature has made it pretty far. Just like children, we always hope that the features we build will do well in school and pass all their tests. Since this isn’t always the case, the QA tester might find some issues with our code. If that happens, we will just keep working on our feature branch and follow the same pull-request-to-QA process until our code is deemed worthy for production. On that day there will be much rejoicing!

QA Tester will move task into QA Approved
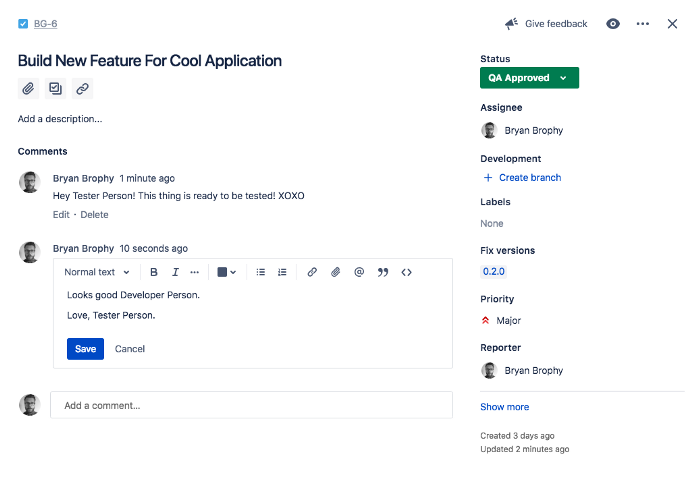
They’ll leave you a comment letting you know the task has passed QA
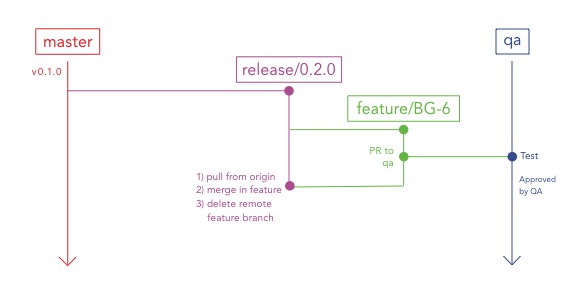
Merging Back into the Release Branch
Now that we have a production ready feature, we need to get it merged into the release branch. There is one consideration before we continue. Has anyone else merged code into the release branch since we branched off of it? Since we are working with a large team, chances are that there is some new code that we will need to integrate with ours. To make sure that our code is merged properly, we need to checkout the release branch and pull down any possible changes.
After pulling down the changes to the release branch, we will merge the feature branch into the release branch. When we merge these 2 branches, we want to run a merge with the no fast forward flag. This will force a merge commit message to be placed in the git history at this point. This will make things easier on us if we need to troubleshoot or rollback in the future.
Since this feature has been approved and merged into the release branch, it is considered done. We will head over to Jira and move the ticket into the done column. This way, everyone will know that the code for that feature is in the release branch and is ready to be deployed with the release.

Updating the Version
Depending on what type of project we have been writing, we might need to update the version of our application before it gets deployed to production. For instance, in a JavaScript project, we will be tracking the version number in the package.json file. We will complete this step after all stories in the release have been merged into the release branch. With the release branch checked out, update the version number if you need to, and commit the changes. If your project is not tracking the version number in the code, you can skip this step.
Tagging the Code for Production Release
The release branch is now ready to be merged into master, where it will be tagged and annotated with the tagger’s information. This annotation is like a guarantee from the tagger saying that they approve this code for release. If there are any problems with the release, everyone will know who to talk to first.
NOTE: We will use the no fast forward flag again when we merge the release branch into master. This ensures that all of the commits that make up this release will be grouped together in the history.
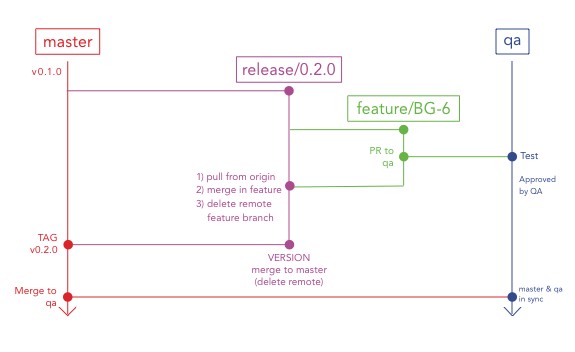
Just like our continuous integration is setup to deploy the QA branch to a QA environment, pushing a new tag to the origin will automatically trigger the CI to deploy that code to a pre-production environment. Once the deploment is finished, the release manager will make sure that pre-production is up and running and then swap pre-production into production. Usually the team will then smoke test production to make sure that all is well.
The final thing to do is merge the changes from master onto the QA branch. This ensures that the QA testing environment is up to date with the production environment as we start working on the next release.
Hot Fixes (aka: Unscheduled Releases)
Let’s face it. No matter how hard we try to exclude bugs from production code, we will inevitably let a few slip by from time to time. If bugs are found in production, the client and/or the team might decide that they are big enough that a fix cannot wait for the next scheduled release. In those cases, we will put out what is known as a hot fix release.
In the examples above, we released version 0.2.0. Presumably, we will now have begun work on version 0.3.0. There we are, plugging away at our keyboards, when a red alert sounds from our project manager. The client found a bug that needs to be fixed pronto. We will get it fixed and release it as version 0.2.1.
The only real difference between a hot fix release and a scheduled release is that we didn’t plan on having the hot fix. As such, we will need to make sure we create a branch for the hot fix release from the correct place. If we have already started on release v0.3.0, we won’t want to include any of that code in the hot fix. Since master is the source of truth for production code, we can create the hot fix release branch from master.
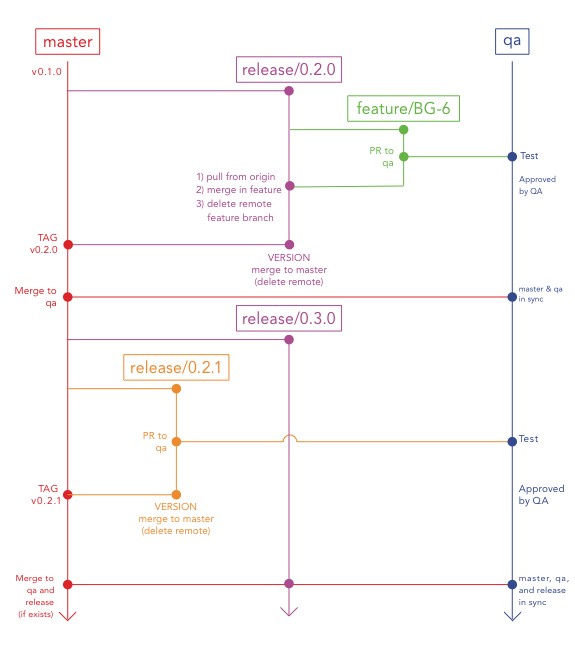
Working on Multiple Releases Simultaneously
Every once in a while, the need might arise for a certain developer or team to start working on features for a future release while the rest of the team is working on features for the next release. We try not to do this on a regular basis, but our process allows for it to happen if needed.
If you look at the diagram above, you’ll see that we were essentially working on 2 releases at the same time, v0.2.1 and v0.3.0. We could extend this to be working on (n) number of releases concurrently. The only thing to remember is that, whenever a release gets pushed to production, we need to merge the code for that release into the release branches that come after it, just like we did after releasing our hot fix.
Conclusion
There you have it, the High Seas Git Flow. Hopefully you were able to follow along. There are a lot of steps and moving pieces, but the process itself is pretty straight forward.